Ok—It is starting to get cold in the great Pacific Northwest. Accordingly, people are wondering if their home is ready for winter. An easy Home Maintenance check, at really anytime of the year, is to determine if your home has the correct amount of attic insulation. Doing so can ensure your home will stay warm in the winter and cool in the summer (this has the added effect of reducing heating and cooling costs as well)
Of course, the obvious next question is:
How much insulation do I need in my attic in the Pacific Northwest?
Well, it depends on where the home is. If it is on the western side of the cascade mountain then you’re in Zone 4. If you are on the eastern side of the mountains, then you’re in Zone 5. It is recommended that Zone 4 homes have attics insulated to an “R” rating of R38. Zone 5 homes should have attics insulated to a level of R49 due to the colder climate. To see what your attic’s current rating is, follow these steps:
Step 1: Take a Look
Take a peek into your attic. (If you don’t know where your attic is, take a look at the ceiling of the closets on the top floor of your home.)
(BE CAREFUL—wear gloves and eye protection. The last thing you need is a chunk of fiberglass in your eye.)
What do you see? If you see the joists rising above your fiberglass or blown-in cellulose insulation? If so, you need more.
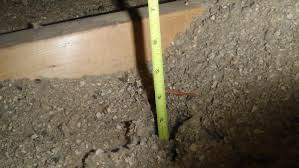
Step 2: Measure
Using your tape measure, or a yard stick, measure the height of your insulation from the bottom of the joist to the top of the insulation. If you are in Zone 4, you should have just over 12 inches of insulation in your attic. In Zone 5, you should have just over 16 inches. (Although different types of insulation have different R-values, a good rule of thumb is R3 for every 1 inch of insulation.
Step 3: Add
Now what do you do if you need more insulation? If you have cellulose insulation that is below the tops of joists, then you need to fill the area between the joists evenly across the attic. If you’re already at the top of the joist with your insulation, then add the appropriate amount to you get to the correct thickness of insulation. (E.g. if you have 2×8 joists and they are filled the you need another of 4 inches of fiberglass batt to get to 12 inches). Put your insulation perpendicular to the joists. This should insure minimal air leakage through the insulation. (Make sure you are following the appropriate safety measures when you do this. Mask, gloves, eye protection, and stay hydrated)
Step 4: Check for possible problems…
Make sure there is no vapor barrier between the layers of insulation. If there is a vapor barrier, then it will need to be removed before installing more insulation. If you don’t you will have all kinds of moisture problems in the attic in the future. Also, don’t block your soffit vents with insulation. The soffits vents allow appropriate air flow throughout the attic.
So, What Now?
This is a pretty simple process and it only takes a little time to fix possible problems. If you’re not really interested in climbing into your hot or freezing attic then feel free to contact me and I can help you assess. Email: todd@homereconnw.com, Call or Text: 253-970-0029.
Recent Comments